

12.27.2016
{john & christina under the mistletoe}
{roxanne and her wreath}
 Roxanne loved taking a little bit of Christmas with her every where she went. who needs a scarf when you have a festive wreath? Block #5 of Tell Me A Christmas Story Quilt
{pumpkin & the Christmas lights}

Everyone was shocked when Pumpkin volunteered to be in charge of the Christmas lights again - especially after last year's tangled fiasco! Block #4 of Tell Me A Christmas Story Block
This block is dedicated to our anxiety ridden Pumpkin cat who sat in our garage and pulled out her hair. The only time she seemed at peace was when she ate the brown mushrooms that occasionally grew in our lawn. We could always tell when she had eaten some because we would find her sitting on the lawn and gazing peacefully at the clouds.
 |
| Hunting for shrooms |
This block is dedicated to our anxiety ridden Pumpkin cat who sat in our garage and pulled out her hair. The only time she seemed at peace was when she ate the brown mushrooms that occasionally grew in our lawn. We could always tell when she had eaten some because we would find her sitting on the lawn and gazing peacefully at the clouds.
12.03.2016
{frank's olympic dreams}

Although Frank failed to medal in the 2002 Salt Lake City Winter Olympics, he carried warm memories of his hometown of Provo being chosen as one of the Olympic venues. It was hard not to wonder what might have been if only he had landed his quad . . .
(Block #3 of Tell Me a Christmas Story)
12.02.2016
{tell me a christmas story}
 |
| Block #1 - Lucy hangs the last ornament |
I love to create a name with the story behind it for each quilt I make. My brain thinks in terms of connections and so it is natural for me to have a heart connection to quilts with a story. I purchased the book, Intentional Piecing, a few months ago and had planned on making several of the quilts. I put it in my "Project" pile and focused on finishing a couple of Christmas quilts I started last year.
 |
| Block #2 - Frosty & Flopsy |
But then . . . I stumbled across the #tellmeastoryholiday blocks complete with stories on Instagram and I WAS HOOKED! I don't pretend to think that this quilt will be complete by Christmas Eve but the first two blocks have left me giddy and anxious to do more.
I going to do "just one more" and then I really must finish the tree . . .
9.11.2016
{david's quilt}
I rarely don't love my quilts once I've finished them (I put a lot of thought and heart in them) but sometimes a color combination just makes your heart sing.

I was slow to fall in love with gray but I have decided it is a true and dependable friend in the color world. It can stand alone and be striking but it can also take a step back and let other colors shine.

This quilt is based on the Vintage Baby quilt pattern by Yoyo Mama Designs. The great thing about this pattern is that by top stitching the raw edged 2 1/2" squares to a background/batting/backing sandwich, you "piece" the top AND quilt the quilt at the same time!

The first time I made this pattern, I used a water soluble marking pen to mark my grid and pins to hold my squares in place while I sewed. By the time I was finished sewing all of those straight lines (and trying to dodge all of those sharp pins), my arms looked like I had wrestled a porcupine.

This time I used a Frixon pen (the ink disappears when ironed) to mark my grid and Roxanne's Glue-Baste-It temporary basting glue to hold my squares in place while I sewed. Lifesavers!!! If you don't own these two sewing tools, buy them. I have found many uses for these two items. They might seem a little pricey but the glue goes a long way and the pen is so versatile.

The pen eliminated having to dab my quilt with cold water to remove the grid lines after the quilt was sewn and four tiny dots of glue - one in each corner - held my squares firmly in place once I had finalized my design and while I sewed/quilted this darling quilt. I love this basting glue because it washes out and leaves the quilt soft to the touch.

A white flannel with a tiny green dot pattern and a Bonnie & Camille navy print with a green dot cut on the bias was the perfect binding.


I've realized that every quilt has taught me something about myself, quilting or life (I guess they're really all one in the same). This quilt taught me to not let long held opinions or thoughts - "I don't like gray." - dictate how I feel or think today.

A few years ago my dad declared that he did NOT like Mexican food. When I asked him the last time he had eaten Mexican food, he answered "Never". He just knew he didn't like it. To my dad's credit, he was willing to go to a great local Mexican restaurant and give it a try. He found out that some of it he didn't care for but other entrees he actually enjoyed. Isn't that the challenge and the adventure of daily living, to stay open to life's possibilities and be willing to give new things a try. Thanks Dad for being willing to try refried beans.

And guess what, I LOVE gray!
6.24.2016
{fancy nancy portable quilt design boards inspired by lori holt}
First, 100% credit goes to Lori Holt of Bee In My Bonnet for her great idea to make smaller, portable design boards to use during quilt block design and construction.
This is my Fancy Nancy version using basting spray and Duck tape to construct my boards.
Materials needed -
Foam core board (use your coupon at Hobby Lobby, Michaels or Joanns)
Basting spray (I like 505 spray), glue gun or craft glue
Duck Tape - it comes in a wide variety of patterns (use your coupon at Hobby Lobby, Michaels or Joanns)
Batting (great use for all of those odd scraps)
Cutting mat, ruler, pencil and scissors
With your quilting ruler as your guide, cut your foam core board to size. You can use a rotary cutter with an old blade, a sharp knife or exacto knife. Just be sure to have your cutting mat underneath your board. I have found 15" squares to be very useful. I did make one board using the whole piece of foam core for those really large quilt blocks. If you do teeny, tiny piecing you could make a smaller board. Make what you'll use. There is no "wrong" size.
Now cut a piece of batting 1/8" smaller than your board. If your board is 15" square, cut your batting 14 7/8" square. I like doing this for two reasons. First, I have found it much easier to cut your batting first rather than try to trim it flush to the board after it's glued. And second, cutting your batting slightly smaller gives you a sharp edge when you apply your Duck Tape.

On the "back" side of your board, measure in 3/4" and draw a pencil line on all four sides. This give you the perfect amount of Duck Tape on both sides of the board.

Take your board outside and spray the whole "front" side of your board (the side without pencil markings) with basting spray. Or you can use a thin layer of craft glue or your glue gun glue around the edges to secure all four sides of your batting to your board.

Secure your batting to the board.

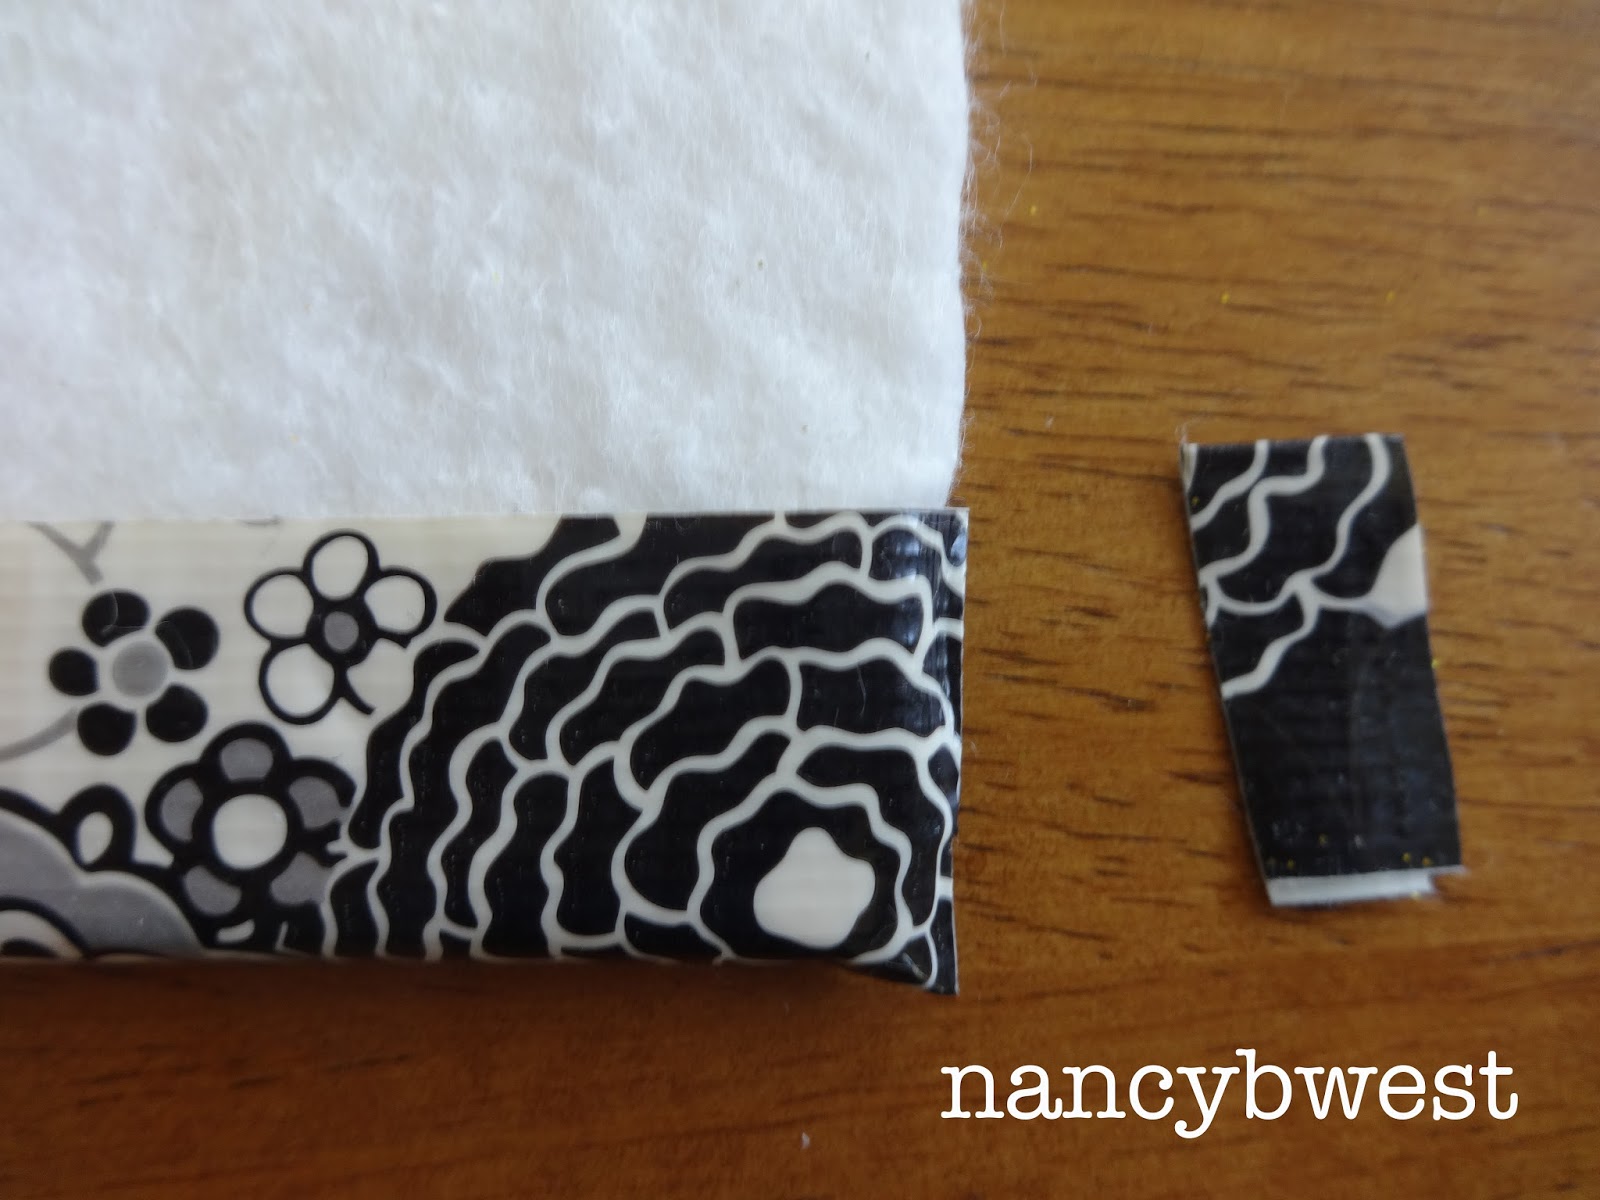
Flip your board over to the wrong side and line up a piece of Duck Tape just a hair beyond your pencil line. Make sure that it extends about an inch on both sides.


Turn your board over and bring the Duck Tape to the front and press with your fingers to secure. On either end squeeze the overlapping edges together and cut next to the board.


Repeat on the opposite side.

On the two remaining sides you will do the exact same thing EXCEPT this time you will notch the tape that extends on the BACK side of the piece. This will allow you to fold the tape back on itself and will give you a clean corner.


Sadly, I have to report that the Duck Glitter Tape was a huge disappointment. It did NOT have the same "stick" as the other designs. I ended up having to go back and glue my corner pieces. I'll use my one Fancy Nancy Glitter Duck Tape board but I won't use the glitter tape on any others. Duck Tape, I had such high hopes . . .


This version of design boards does not require an iron. I think my dislike for the ironing part of quilting harkens back to my childhood days when everything was cotton and so everything needed ironing (today it doesn't seem to matter as much if things are ironed but I still love the smell of my ironed pillowcases and the look of a well pressed dress shirt).

I spent many an hour seated at my Mom's Ironrite (it probably wasn't that often but it sure seemed like it!) ironing pillowcases and imagining that they were the curtains being raised on "Let's Make A Deal" or "Queen For A Day" to reveal the Grand Prizes. Don't you love the sales pitch?!? The end of "home's last drudgery!"
This is my Fancy Nancy version using basting spray and Duck tape to construct my boards.
Materials needed -
Foam core board (use your coupon at Hobby Lobby, Michaels or Joanns)
Basting spray (I like 505 spray), glue gun or craft glue
Duck Tape - it comes in a wide variety of patterns (use your coupon at Hobby Lobby, Michaels or Joanns)
Batting (great use for all of those odd scraps)
Cutting mat, ruler, pencil and scissors
With your quilting ruler as your guide, cut your foam core board to size. You can use a rotary cutter with an old blade, a sharp knife or exacto knife. Just be sure to have your cutting mat underneath your board. I have found 15" squares to be very useful. I did make one board using the whole piece of foam core for those really large quilt blocks. If you do teeny, tiny piecing you could make a smaller board. Make what you'll use. There is no "wrong" size.
Now cut a piece of batting 1/8" smaller than your board. If your board is 15" square, cut your batting 14 7/8" square. I like doing this for two reasons. First, I have found it much easier to cut your batting first rather than try to trim it flush to the board after it's glued. And second, cutting your batting slightly smaller gives you a sharp edge when you apply your Duck Tape.

On the "back" side of your board, measure in 3/4" and draw a pencil line on all four sides. This give you the perfect amount of Duck Tape on both sides of the board.

Take your board outside and spray the whole "front" side of your board (the side without pencil markings) with basting spray. Or you can use a thin layer of craft glue or your glue gun glue around the edges to secure all four sides of your batting to your board.

Secure your batting to the board.

Flip your board over to the wrong side and line up a piece of Duck Tape just a hair beyond your pencil line. Make sure that it extends about an inch on both sides.


Turn your board over and bring the Duck Tape to the front and press with your fingers to secure. On either end squeeze the overlapping edges together and cut next to the board.

Repeat on the opposite side.

On the two remaining sides you will do the exact same thing EXCEPT this time you will notch the tape that extends on the BACK side of the piece. This will allow you to fold the tape back on itself and will give you a clean corner.


Sadly, I have to report that the Duck Glitter Tape was a huge disappointment. It did NOT have the same "stick" as the other designs. I ended up having to go back and glue my corner pieces. I'll use my one Fancy Nancy Glitter Duck Tape board but I won't use the glitter tape on any others. Duck Tape, I had such high hopes . . .


This version of design boards does not require an iron. I think my dislike for the ironing part of quilting harkens back to my childhood days when everything was cotton and so everything needed ironing (today it doesn't seem to matter as much if things are ironed but I still love the smell of my ironed pillowcases and the look of a well pressed dress shirt).

I spent many an hour seated at my Mom's Ironrite (it probably wasn't that often but it sure seemed like it!) ironing pillowcases and imagining that they were the curtains being raised on "Let's Make A Deal" or "Queen For A Day" to reveal the Grand Prizes. Don't you love the sales pitch?!? The end of "home's last drudgery!"
5.25.2016
{buttercups, blow snakes and becoming Fancy Nancy}

"Never underestimate the power of dreams and
the influence of the human spirit.
We are all the same in this notion:
The potential for greatness lives within each of us."
- Wilma Rudolph -
You cannot overstate the impact for good in a child's life when adults show interest and confidence in his or her abilities, talents and dreams.
Mr. and Mrs. Klemm were two such people in my life. They lovingly called me "Fancy Nancy" long before the Fancy Nancy books were written and the Fancy Nancy dolls were sold. In fact, this week at Mr. Klemm's funeral, I felt honored and loved when the Klemm children, all grown up, called me "Fancy Nancy" as we hugged and visited.

Being "Fancy" was very important to a little girl growing up as number five in a family of seven children. It was an early acknowledgement of my individuality and value.
Not that my own parents didn't value and love me but the fact that someone else, unrelated, took interest in and loved me was life changing. And as I added a husband and children to my life, they loved them too.
When I was about four or five and was feeling very under appreciated and misunderstood (I was a bit dramatic), I decided to run away from home. I packed my essentials in my doll buggy and promptly ran away to Klemm's house across the street. I don't recall the rest of the day but at some point I returned to my home. I may not have moved in to Klemms that day but I did spend countless hours throughout my childhood underneath their roof. The threads of their family are woven throughout the fabric of my life. I cannot think of my life without thinking of theirs.

My garden contains buttercups in honor of Mrs. Klemm. When I was young, Klemms had buttercups growing by their irrigation head gate. One day Mrs. Klemm showed me that you could find out if you liked butter by holding a buttercup under your chin. If it showed yellow, you liked butter. I learned that and a thousand other things as I watched, listened and loved my time with Mrs. Klemm. And yes, I still like butter.

Mr. Klemm taught me that blow (gopher) snakes are called that because they blow. One day a large blow snake was cornered in Klemm's cellar window well and as Mr. Klemm and I got closer, it began to blow (it sounded like a creepy, heavy breathing phone call from an Alfred Hitchcock movie to my little girl ears). I didn't know what the sound was and I was terrified. Mr. Klemm explained that it was the snake making that sound (not a creepy, serial killer crouched in a tiny cellar window well - I had a great imagination) and reassured me that the snake was as scared as I was and was just trying to protect itself. I felt safe with Mr. Klemm by my side.

I don't think Mr. and Mrs. Klemm set out to "teach" me. Instead, because of their willingness to make time and room in their hearts for a little neighbor girl, they loved me and I knew it. And that love, added to my own family's love, transformed me.
Thank you Mr. and Mrs. Klemm - thank you from a five year old neighbor girl and a now grown woman - for the tremendous positive influence you have had in my life!

In honor of the cherished memories I have of your family and your home on Grovecreek Drive, I have a curl in my banister, an arch between my living room and dining room, a room dedicated to creating things that make me smile, a Fancy Nancy doll (or two), beautiful decorations created by Mrs. Klemm, buttercups in my garden and memories and lessons for a lifetime.

My hope is that I can make someone else feel fancy like me.
With all of my love and appreciation for making me Fancy!

Love, Fancy Nancy
5.23.2016
{fancy nancy flying geese ruler}
I love my Quilt In A Day flying geese rulers!
I decided that for quick reference and to save me having to retrieve the instructions every time I use my rulers, I would type up the dimensions of the squares needed for the two sizes on each ruler and tape them to the ruler. (If you saw my sewing/creation lab, you would understand how useful this has been.)
First, I pasted a picture of a "goose" and the measurements for both rulers to a document. I made it small so they wouldn't obscure the guidelines on the ruler.

Second, I printed my document and trimmed down my squares.

Third, I turned my rulers RIGHT SIDE FACING DOWN and used wide, clear packing tape on the WRONG SIDE of my square (I made it small enough that I had a thin edge of tape extending beyond my square on all four sides) to adhere my square to the WRONG SIDE of my ruler.

Fourth, I turned it over, admired my genius and went back to cutting the gigantic flock of geese that I need for a very special Fancy Nancy quilt.

I'm hoping that by taping it to the wrong side of my ruler underneath my gripper strips and protecting it with the layer of packing tape, my instructions will hold up for a very long time.

2.14.2016
{G is for Gracie}

There are people in your life that
you want to celebrate.

My granddaughter, Gracie,
is one of those people in my life.
She has the kindest heart,
the deepest dimples
and the gentlest spirit.

Her quilt reminds me of banners.
The design is quite simple -
long rectangles ending with flying geese blocks.
I wanted the quilting to resemble a banner
blowing in the breeze.

I'm not quite sure why the green circle photographed
more vibrant than in "real life".

This quilt celebrates all things Gracie.


I used a soft flannel for the backing.


I think Gracie had a lot of fun with Aunt Vanessa
during our "photo shoot" by Provo River.

One last shot of the beautiful Provo River
on an autumn afternoon.
Subscribe to:
Posts (Atom)